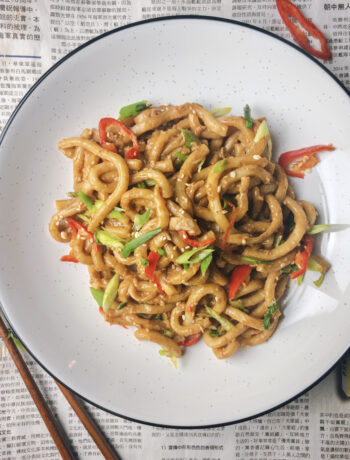
This Kimchi Risotto is out of this world! It’s creamy, tangy and just UTTERLY DELICIOUS. I highly recommend topping it with a poached egg to oomph up the luxuriousness of this dish.

If this isn’t the perfect marriage of two cuisines from opposite ends of the world, I don’t know what is. The tanginess of the kimchi is perfect for cutting through the richness of the creamy risotto, leaving you longing for more after each bite. NGL, I’ve never really had an interest in standing at the stove for an hour, stirring and stirring and stirring. But now… there’s nothing else I need to do, and no where else I have to be. So if your excuse for not making risotto at home has always been “I don’t have enough time to make it”, well well well… you now have time aplenty.
Risotto can be quite finicky but here’s the three golden rules for perfect risotto every time:
- Use hot stock – adding chilly stock to a hot pan can bring the temperature down and basically mess up the cooking process
- Stir it often, but not constantly – stirring the rice constantly will add air into the risotto thereby cooling it down and making it gluey. BUT, if not stirred enough, the risk will stick to the bottom of the pan and burn. Stirring is vital for risotto because its creaminess comes from the starch generated when the rice grains rub against each other. In conclusion, stir it often and if your arms need a break, give it (& the rice) a break!
- Do NOT add too much stock – if you dump in all the stock at once, you’re basically just boiling the rice. By adding the stock gradually, the rice gets a chance to release all that creamy starch. It is very important that you wait until all the stock is absorbed before you add more into the rice.
Now, about the egg! You could always poach it as you normally do for an avocado toast (& it would be absolutely delicious) but why not jazz it up with an Onsen egg? These babies are jewels of deliciousness with a texture that lurks between the lines of fluid and solid, jelly and custard. I mean…cutting into them is basically yolk porn at its finest. YUM. The fool-proof method to make them is using a temperature controlled method (i.e. sous vide) but fret not if you don’t have one, there is a way (see my recipe notes below)! They may take some practice but I promise, 100% worth every single bit of effort.

Check out some of my other recipes that uses kimchi – Kimchi Mac and Cheese & Kimchi Fried Rice.
If you do try out my Kimchi Risotto recipe, please please please leave a comment, tag me on Instagram (@Chyuens_), just get in touch! I’d love to see how it turns out x.
This Kimchi Risotto is out of this world! It’s creamy, tangy and just UTTERLY DELICIOUS. If using a sous vide, start with the onsen egg. Bring the water up to 63°C and gently add the eggs in. Cook for 1 hour then remove the eggs immediately and place them in a bowl of ice water. Set aside until ready to use. If not using a sous vide, see Note 1. In a pot, bring the chicken stock to a simmer over medium heat. Stir in 2 tablespoons of kimchi juice. The stock needs to remain hot when adding to the risotto. In another pan/pot, melt 10g of butter over medium heat. Once melted, add in the shallot and fry until it becomes translucent and fragrant. Add in the kimchi and cook for 2-3 minutes. Mix in the arborio rice and cook for another 2 minutes. Add one ladle of stock into the rice and stir to combine. Wait until the rice absorbs all the stock before you add the next ladle, and continue until the rice is cooked to your desired doneness. If the stock has finished but the rice is still not soft enough, just add in a bit of hot water at a time and continue. When the risotto is almost ready, mix in the other 10g of butter, parmesan and chives. Season with salt and pepper to taste. Place the risotto onto your serving plate and gently crack open the onsen egg above it. Garnish with chives and serve immediately. 1. To make onsen eggs without sous vide: Heat a full pot of water to a rolling boil (choose the pot size depending on the number of eggs you’re using). As soon as it starts to boil, take it off the heat completely. Let it cool slightly for 1 minute. Quickly, take the eggs from the refrigerator and place them carefully in the hot water. Stir it gently to make the water temperature even and then cover immediately and let it sit for 16 to 17 minutes. Make sure to use a timer! Once the time is up, remove the eggs from hot water and place them in an ice bath.Kimchi Risotto

 (5 votes, average: 4.80 out of 5)
![]() Loading...
Loading...Ingredients
Instructions
Notes


Gail
August 17, 2020 at 6:52 amMade this and it was deeeeelish. Just a twist on a simple risotto but the kimchi made it perfect with our korean bbq steak that we had. As with all risotto, I added about 1/4 cup of Greek yogurt just before taking it off the stove….this kicks up the creaminess to another level and adds a bit of protein 🙂
Chyuen
August 21, 2020 at 9:07 amI’m so glad you enjoyed it!!! That’s so interesting, I’ve never tried adding greek yogurt to risotto before. Will definitely be trying that out soon, thanks for the tip 🙂