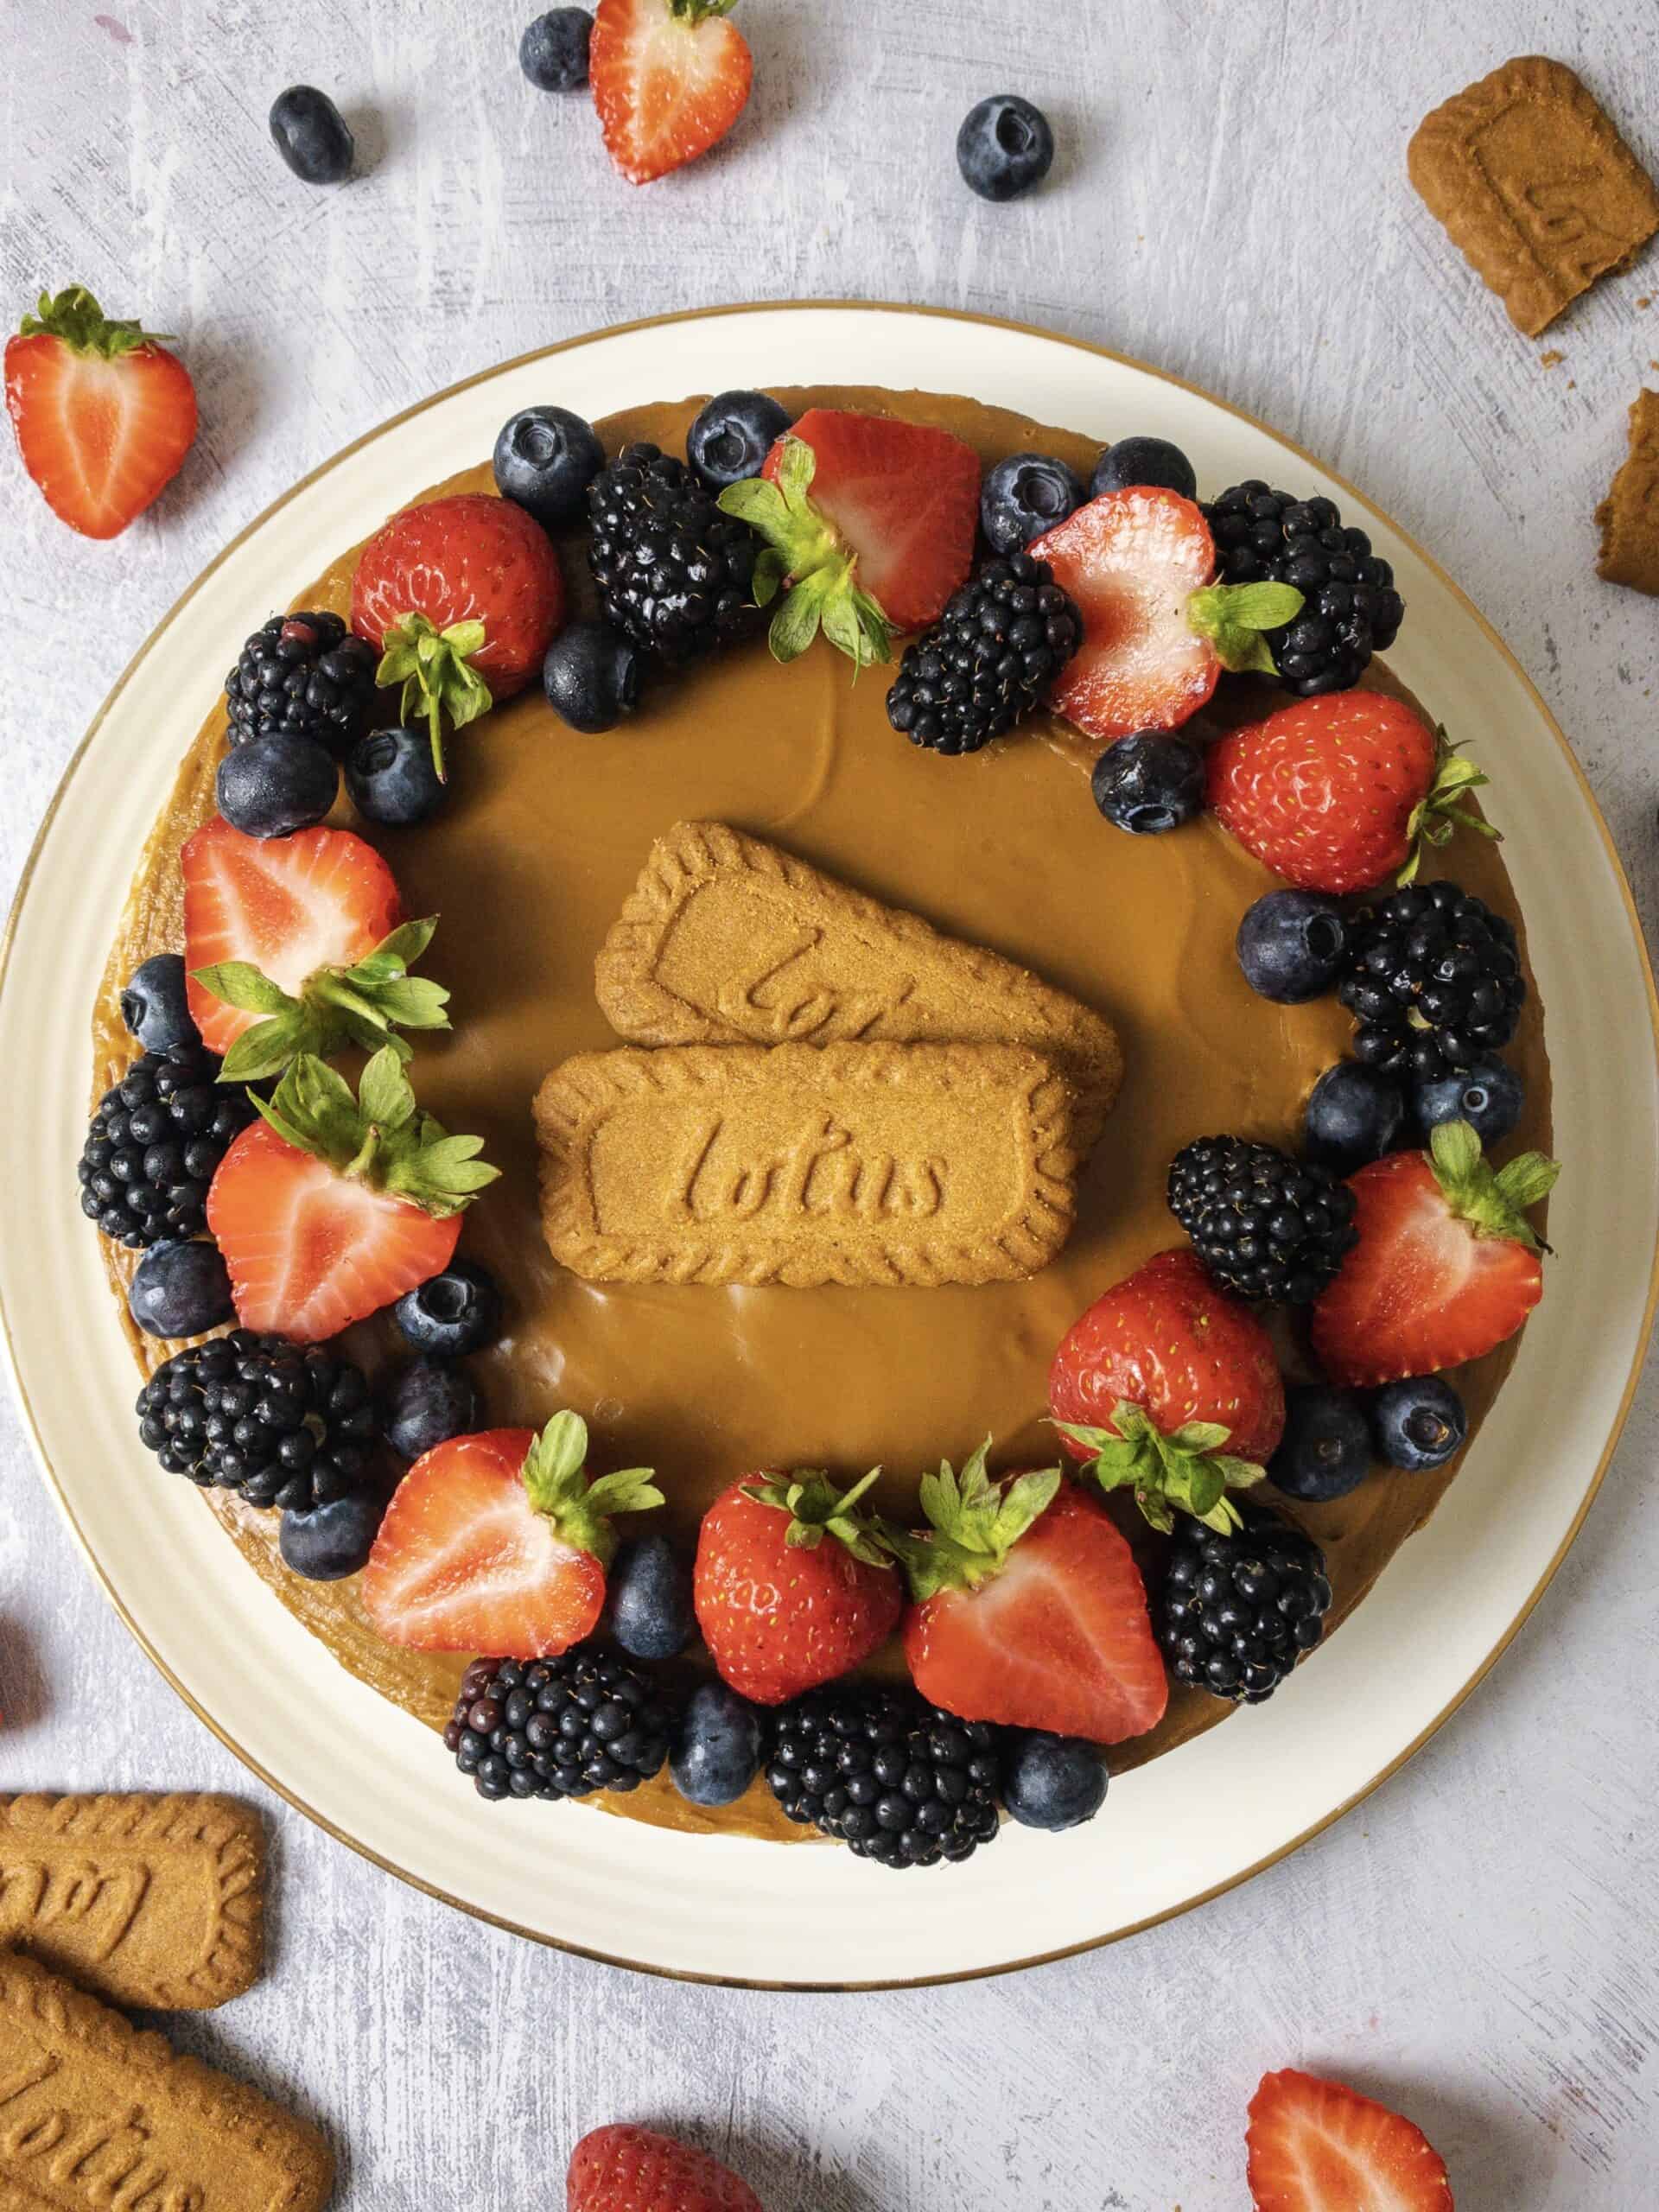
If you love Biscoff, this is THE cheesecake for you! It’s insanely creamy yet has a mousse-like texture that’s light as air, it’s honestly Biscoff bliss. Whether you garnish with crushed Biscoff biscuits for extra Biscoff goodness or with sliced mixed berries to add some tartness to this glorious decadence, it will be delicious!!! Minimal effort, no oven required, and maddeningly delicious.

Biscoff, Biscoff, Biscoff, I will never tire of it. It’s just one of those flavours that’s taken the world by storm and thankfully, is here to stay. Just like Nutella, it’s extremely addictive – I may have made way through a tub of it, eating it spoon after spoon. My point is, we don’t judge here. It was only natural to try and combine it into as many things as I could such as in brownies, ice cream and cookies. Today, ladies and gents, I’m sharing this absolutely phenomenal No-Bake Biscoff Cheesecake recipe. I love it, my friends and family love it, and more importantly, YOU WILL TOO!
Making this cheesecake couldn’t be any easier. No baking involved at all and so incredibly delicious! I promise, it’s nothing like the dense and overly rich no-bake cheesecakes you’ve had before. This No-Bake Biscoff Cheesecake is so so so creamy yet retains an airy mousse-like texture – it’s just out of this world.
What was also important to me when I was creating this recipe was that the cheesecake filling could not be too cream cheesy. I don’t know about you but I’m not a fan of cheesecakes where you basically feel like you’re biting into a block of cream cheese. In this recipe, the cream cheese adds a much needed tang to the cheesecake while the whipped cream lightens the filling to give you that airiness.
What is Biscoff spread?
In my mind, Biscoff is basically like Nutella but instead of being made with hazelnuts, it’s made with crushed up Biscoff cookies i.e. a cookie butter. It has a consistency that’s almost like peanut butter (comes with both smooth and crunchy options too) but with the hints of warm spices like cinnamon, nutmeg and ginger, as well as a deep caramel flavour. Fun fact – Biscoff refers to Europe’s favourite combination of cookie and coffee, and the cookie used in this case is known as Speculoos (a generic name for traditionally crispy spiced cookies in Belgium). This means that Biscoff cookies are the same as Speculoos.
You’ll see the term ‘Lotus’ being used in front of Biscoff spreads or biscuits a lot because it’s just the most recognised and easily accessible brand. Some supermarkets such as Trader Joe’s now also carry their own version of Speculoos Cookie Butter. I can’t tell you which is better but you could definitely use either for this recipe.
The Biscoff dream
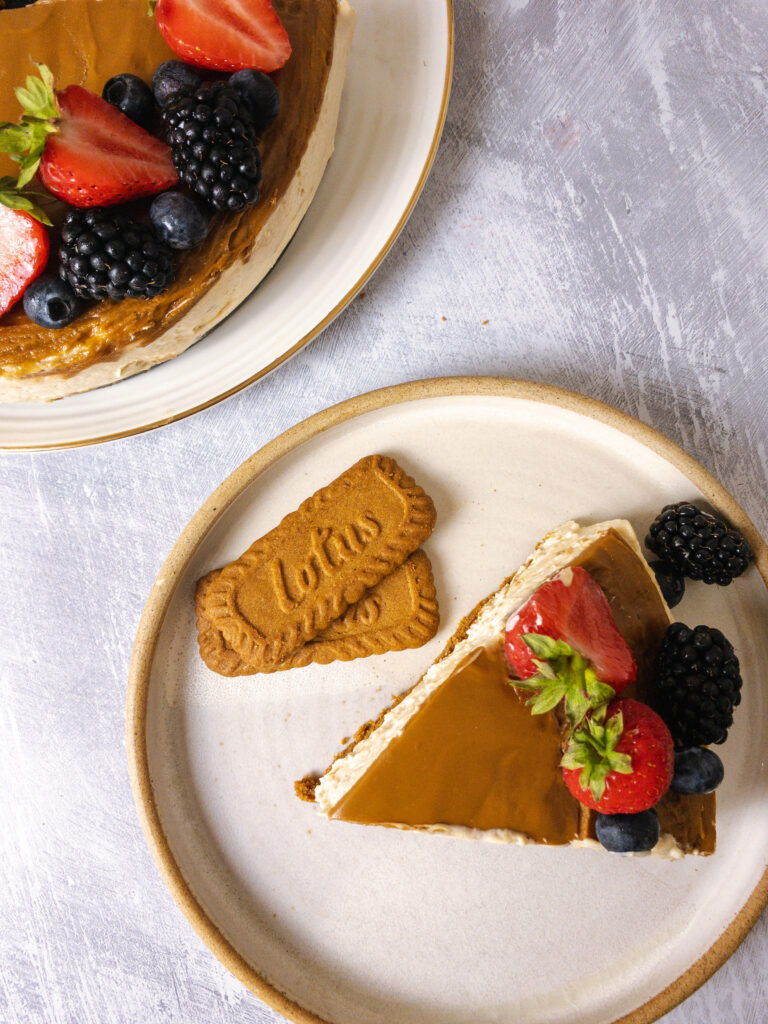
For all my fellow Biscoff lovers, I’ve added Biscoff into all the elements of this cheesecake. You’ve got a crunchy Biscoff crust, a delicious and airy Biscoff cheesecake filling and lastly, a layer of melted Biscoff spread on the top. You could also add crushed Biscoff biscuits as a garnish later on but I prefer using a mixture of berries as it lends some tartness (read: balance) to this sweet treat. But you do you!
How do I make this cheesecake?
You start with the biscuit base. Simply crush up some Lotus Biscoff biscuits and mix it with melted butter. Then, press it into a nice even layer in your prepared cake tin and pop it into the freezer to set up while you get on with the rest of the recipe.
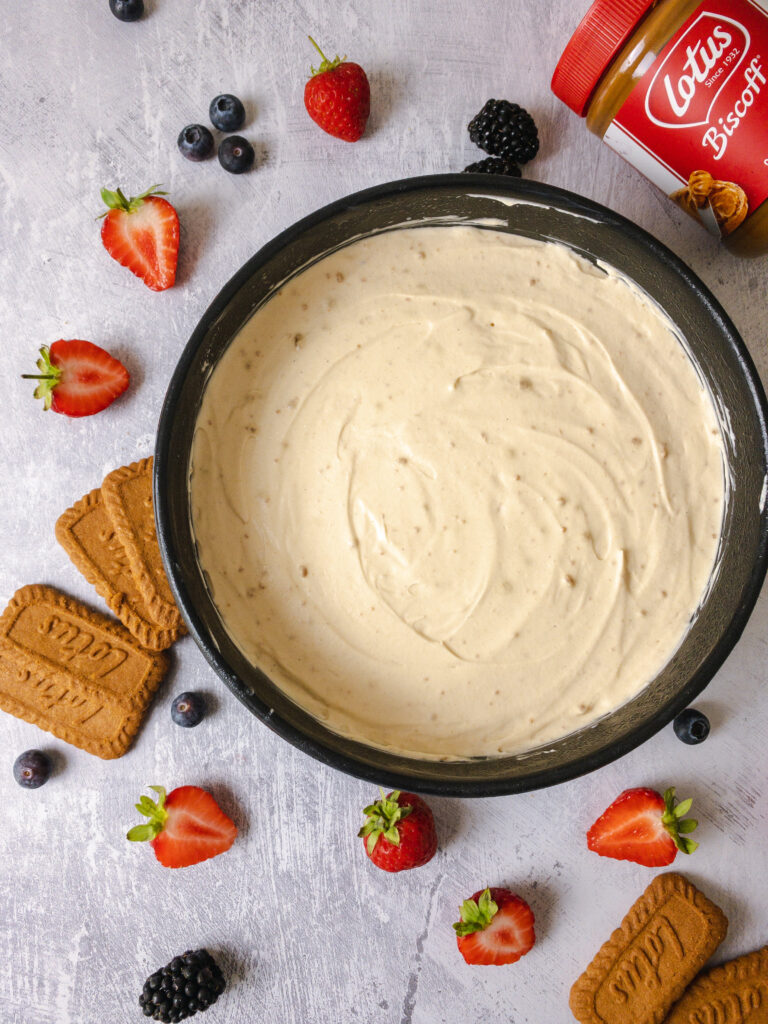
For the filling, whisk cold double cream until you get stiff peaks (i.e. when the peaks in the cream stands straight up when the whisk is lifted) – be patient! In another bowl, combine the cream cheese, icing sugar, salt, vanilla extract and Biscoff spread. Gently fold in the whipped cream into the cream cheese mixture and voila, that’s your cheesecake filling done!
Pour the filling into the cake tin with the crust, smooth out the top with a spoon, and refrigerate for at least 4 hours or ideally, overnight. When you’re nearly ready to serve, don’t forget to top it with melted Biscoff spread and some mixed berries or crushed Biscoff biscuits. See recipe card for tips on how to get neat and tidy slices of cheesecake!

Biscoff cheesecake FAQ
How far in advance can I make this cheesecake? You can make this cheesecake anywhere from 4 hours up to 2 days in advance. I tend to prepare this cheesecake the night before.
How do I ensure that the cheesecake can be easily removed from the cake tin? Use a springform cake pan! Also, make sure that you grease and line the bottom of the cake pan with parchment paper.
How should I store leftover cheesecake? The cheesecake will keep nicely in the fridge for up to 5 days. You could also freeze it without the garnish (berries/crushed biscuits), just make sure you keep it in an airtight container or wrap it tightly with cling wrap. Simply thaw it in the fridge overnight before serving. You could most definitely also have it semi-thawed, it’ll basically be cheesecake ice cream! YUM!!!
Can I use other types of spreads? Defo! Feel free to swap out the Biscoff spread for Nutella or peanut butter. For the latter, you will need to add more sugar as peanut butter is less sweet than Biscoff spread. That said, you could also just use the base cheesecake recipe and add oreos, crushed chocolate bars etc.
If you love Biscoff, this is THE cheesecake for you! It’s insanely creamy yet has a mousse-like texture that’s light as air, it’s honestly Biscoff bliss. Whether you garnish with crushed Biscoff biscuits for extra Biscoff goodness or with sliced mixed berries to add some tartness to this glorious decadence, it will be delicious!!! Minimal effort, no oven required, and maddeningly delicious. Grease an 8 inch round tin and line the bottom with a piece of parchment paper (Note 1). A springform pan or one with a removable ase would be best. Crush the biscuits into a fine crumb (either in a food processor or pop it into a ziplock and smash it with a rolling pin or pan until finely ground) and mix it with the melted butter until evenly combined. Spread the crumb mixture into the bottom of the prepared tin and press it in with a flat-bottom glass (anything with a flat bottom will do). Make sure that it’s an even layer and that you compact it nice and tight. Pop it into the freezer to firm up while you prepare the filling. In a stand mixer with the whisk attachment, beat the double cream on medium speed until stiff peaks form (Note 2). You could definitely do whisk it by hand as well. Be careful not to over whip the cream so it doesn’t curdle. Gently transfer the whipped cream into another bowl and refrigerate until ready to use. Using the same mixer, switch over to the paddle attachment now. In the same bowl that was used to whisk the cream, combine the cream cheese, icing sugar, salt, vanilla, and biscoff spread until smooth and evenly incorporated. Gently fold in half of the whipped cream into the cream cheese mixture until just combined before adding the other half and folding in again until the filling is uniform in colour. Remove the prepared tin and pour the filling over it. Use the back of a spoon to spread the filling into an even layer and smooth the surface. Cover tightly with cling wrap and refrigerate for at least 5 hours or ideally, overnight. 30 minutes before unmolding the cheesecake from the pan, pop it into the freezer to harden. It’ll make slicing and serving much easier, especially after adding the warm Lotus Biscoff spread later on. Use a butter knife to loosen the chilled cheesecake from the sides of the cake tin and remove the rim. Carefully lift the cake off the removable bottom of the pan (use a thin wide spatula or a cake lifter if you have one), remove the parchment paper, and transfer to your serving plate. Microwave 150g of biscoff spread for 20-40 seconds until melted and very fluid then pour over the cheesecake, quickly spreading it out into a smooth, even layer. You could decorate the rim of the cake with mixed berries or crushed biscoff biscuits. At this point, you could pop it back into the refrigerator to set even more or serve immediately. This cheesecake should be served cold. For neat slices, dip a sharp knife in hot water for a couple of seconds, dry it, then slice! I recommend dipping your knife in hot water and wiping it down between each slice to ensure tidy slices of cheesecake. If you have any leftovers, they can be kept in the fridge for up to 5 days. 1. Cut the parchment paper following the shape of your tin and line the bottom. Speaking from experience, it will be very difficult to remove the cheesecake from the base of the tin if you do not do that.
No-Bake Biscoff Cheesecake
 (2 votes, average: 5.00 out of 5)
![]() Loading...
Loading...Ingredients
Instructions
Notes
2. Stiff peaks in the cream refer to when the peaks are just stiff enough to stand up firmly when the whisk is lifted.